Back again with another part of the Unreal Engine 4 Voxel Terrain tutorial! In this part of the Voxel Terrain tutorial series we’ll be building a material to texture our mesh, and making two small code changes to automatically apply the material. Before we get started you’ll probably want to download the assets we’ll be using in this tutorial; you can find those here. As a bonus the content file also contains the materials we’ll be making today, so feel free to use it as a reference while making your own materials. With that let’s get started on the tutorial.
The Master Material
Like I mentioned before I’ve included the material we’re making in this section in the download above, and I highly recommend you download those assets and have the material open while you follow this tutorial so you can use it as a reference. There are a lot of methods you could use to texture the mesh we’re working with, however, the simplest one to implement in the system we’ve created with the previous tutorials uses world coordinates for texture mapping. In the future I’ll be covering some alternative methods as well, because this one requires 6 samplers per texture, which can add up really quickly if you decide to add normal maps or any other optional textures.
If you’re using a platform that supports shared texture samplers you should definitely make use of them where possible; they can save an immense number of samplers in this material. In the simple grass material we’ll be creating it makes the samplers used go from 6 to 3. To allow a sampler to be used as a shared sampler simply select it and change Sampler Source from From Texture Asset to one of the two shared options; the rest will be taken care of automatically by the engine. I suppose we need to start making the material before this advice will be of any help though, so let’s get started with that.
Creating The Material
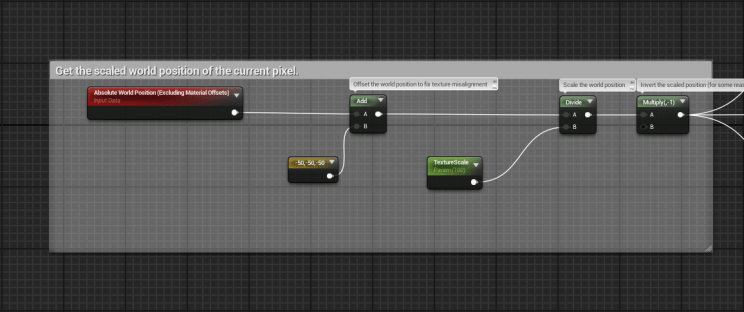
Alright, start off by opening the editor and making a new material in your content folder. Open up the material you just created if you haven’t already. We’re going to be making a simple opaque surface material so we don’t need to change any material settings from their defaults. To start off we’re going to need a Absolute World Position node, which you can find by searching for World Position, the one you need will be under Coordinates. Drag off from that and make a new Add node, and connect the second input of the new add node to a Constant 3Vector with the value (-50, -50, -50). The result of this addition node will get us an offset position, which we need to correct a texture tiling issue that would occur if we didn’t have this here.
Dragging off from the output of the add node, create a Divide node. Connect the second input of the new node to a Scalar Parameter named TextureScale. Set the default value of the new parameter to a value of 100. This will cause our offset position to be scaled from centimeters to meters. We want this because our voxels are 1 meter wide, so we want our texture to tile every meter. This is a parameter so you can change the scale to fit with the size of your voxels.
Finally, drag off from the output of the division node and create a new Multiply node. Set the value of the second input to a constant of -1. We need to invert our coordinates or else our textures will end up being upside down! With that we have the first section of our material setup and ready to go; check out the image below to make sure you got everything right though.
If you have that correct then get ready for the next section, which is an equally simple setup. Go ahead and start by creating a VertexNormalWS node, and break it’s output apart using the BreakOutFloat3Components node. For each of the outputs of the BreakOutFloat3Components node drag off and create an abs node. We won’t be using the output of this section for some just yet, however, it’s good to get it out of the way because we will need it in multiple places. It should look like this if you’ve done it correctly:

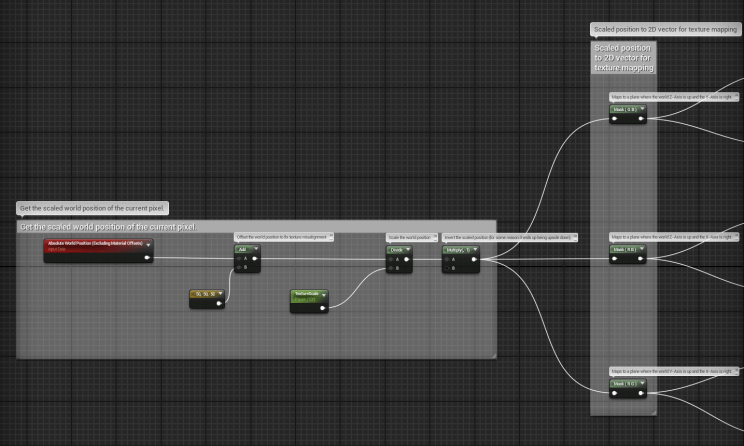
Moving on, up next we have the texture mappings. To do this we need to make 3 Mask nodes, each of which will provide UVs for two texture samplers. Wire up the output of the Multiply node from earlier to the inputs of the mask nodes. Next we need to set the mask nodes to output the correct masks, specifically we need to set them to the following three output modes:
- Mask (GB) – Z, Y Plane
- Mask (RB) – Z, X Plane
- Mask (RG) – X, Y Plane
Once you have the three nodes set on the correct modes, you should see something like this:
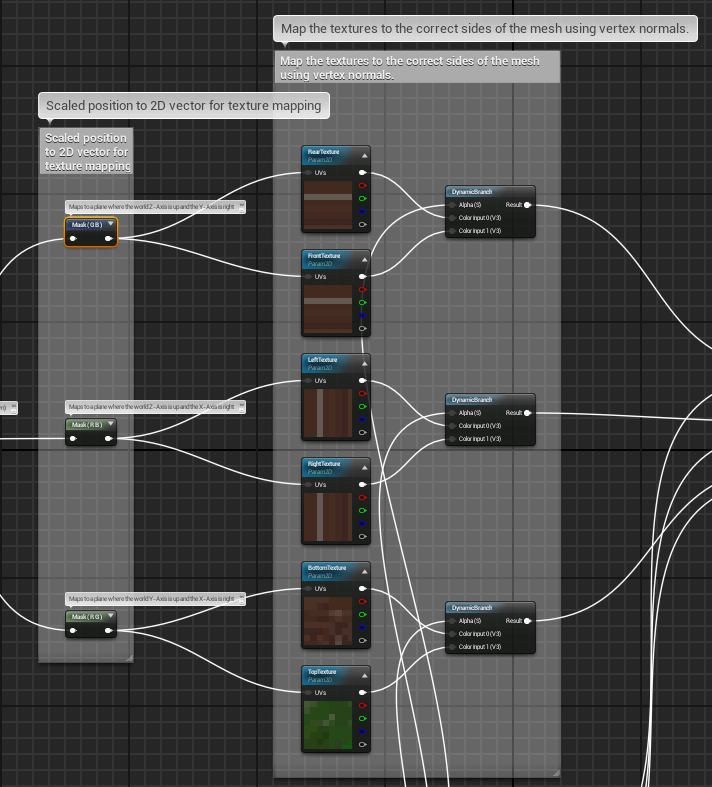
As I said before each of those mask nodes will be connected to two different texture samplers, one for each of the two sides of the plane defined by the mask nodes. Go ahead and create six (6) TextureSampleParameter2D nodes. Name and wire them like so:
- Mask (GB) – Z, Y Plane
- RearTexture
- FrontTexture
- Mask (RB) – Z, X Plane
- LeftTexture
- RightTexture
- Mask (RG) – X, Y Plane
- BottomTexture
- TopTexture
Next you’ll need to make three DynamicBranch nodes, one for each pair of samplers. Wire Color Input 0 to the first sampler of the pair, and Color Input 1 to the second sampler of the pair. Then wire the Alpha input of each branch to the appropriate output on the BreakOutFloat3Components node we made previously as shown below.
- Z, Y Plane(Front/Back) to R output
- Z, X Plane(Left/Right) to G output
- X, Y Plane(Top/Bottom) to B output
And just to be sure you got that right here is another image showing it in the editor:
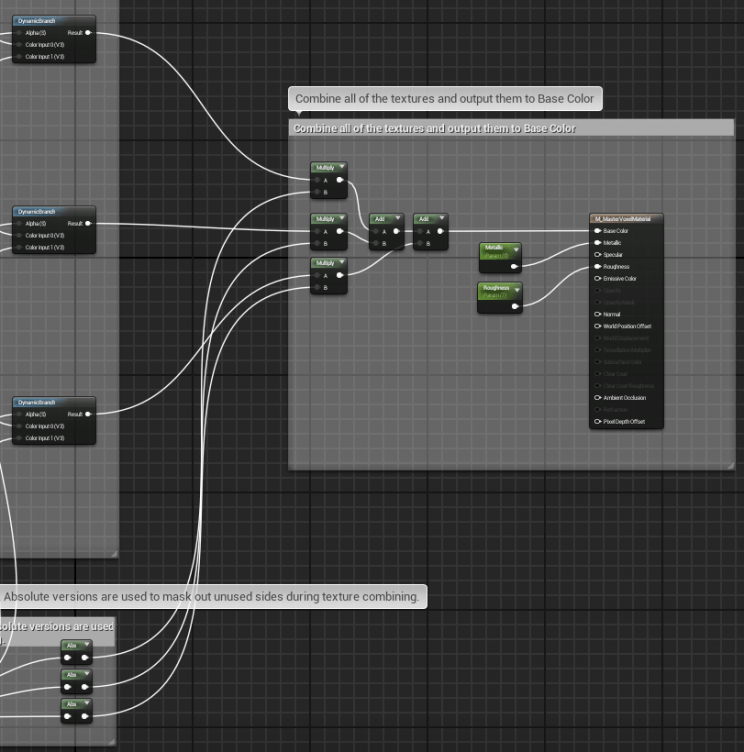
Now we only need to combine all of the texture samples together, to do that we need three (3) Multiply nodes and two (2) Add nodes. Take the three multiplication nodes and wire each of their A inputs to one of the DynamicBranch outputs. Next wire the B inputs of the multiplication nodes to the Abs node that corresponds with the axis of the textured face. Then wire the outputs of two of the multiplication nodes to the inputs of one of the addition nodes, and add the remaining multiplication node to the output of the other addition node. Finally connect the output of the last addition node to the Base Color input on the material struct.
Before we call the material finished go ahead and make two more Scalar Parameters. Call one of them Metallic and the other Roughness, and give them default values of 0 and 1 respectively. These two parameters will allow us to control the shading of the material from material instances. Wire the two new nodes up to the inputs on the material struct with matching names, and you’ll be all done with the master material. That last bit of wiring should look like this:
Setting Up The Grass Material Instance
The material we just made is supposed to be used through material instances, so go ahead and right click the material in the content browser and click Create Material Instance. Name the new material instance whatever you want; I called mine M_VoxelGrass. Open it up, we need to change some parameters. Specifically, we need to change what textures the material uses. Set the top texture to the GrassTop texture I included with my content pack, next set the the bottom texture to the Dirt texture, and finally set the rest of the sides to the GrassSide texture.
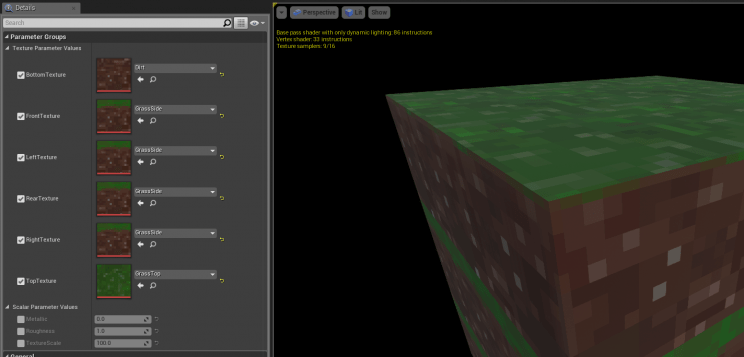
Feel free to tweak the Roughness and Metallic values to your liking while you have the material instance open. Personally I think it looks best on the default settings, so I’m not going to change anything else here. Repeat this process with different textures for every terrain material you’d like to create. Now we just need to apply the material and we’ll be all done.
Applying The Material
At last we need to put our voxel terrain into the world! Without the code changes we’re going to make after we test this our material won’t be applied automatically, so to apply it we need to create a voxel terrain actor and simulate the world so we have access to the material of the procedural mesh. An important thing to do, however, is make sure that your terrain actor is at the center of the world! If your actor isn’t placed at the center (Or, at exactly 1 meter intervals from the center) then the textures won’t tile correctly.
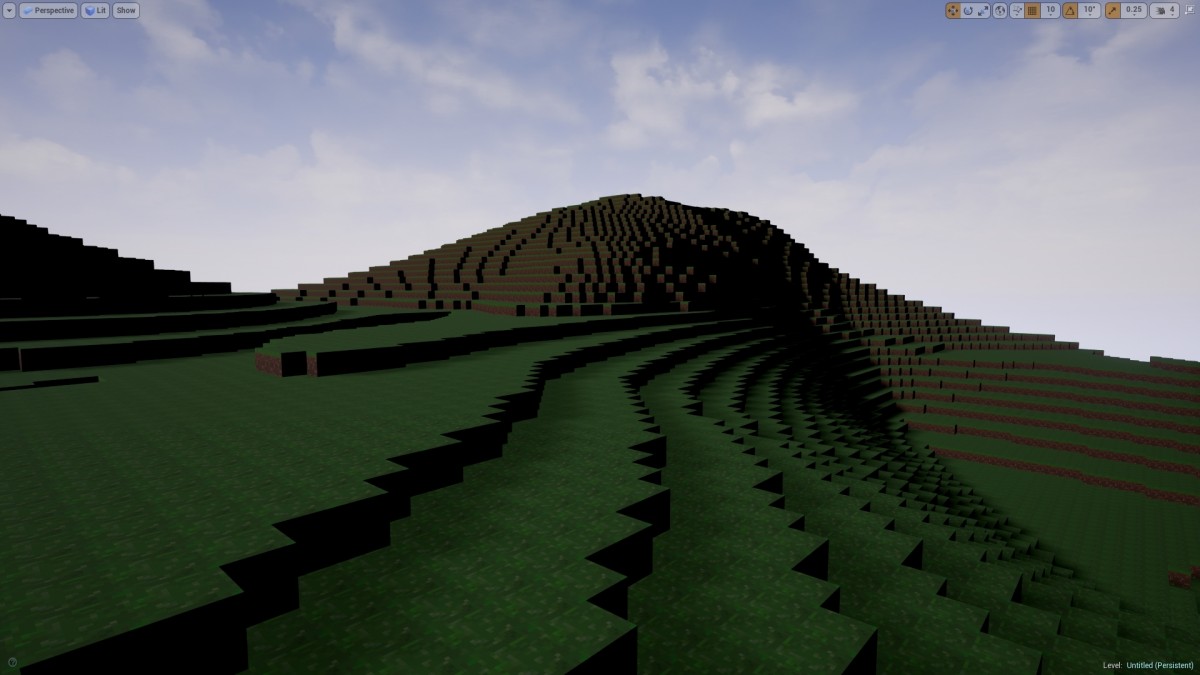
Once you have your terrain actor placed at (0, 0, 0) go ahead and simulate the world. Your editor will probably freeze up for a minute while the voxels generate, and once it unfreezes you will probably see something like this in the sky:
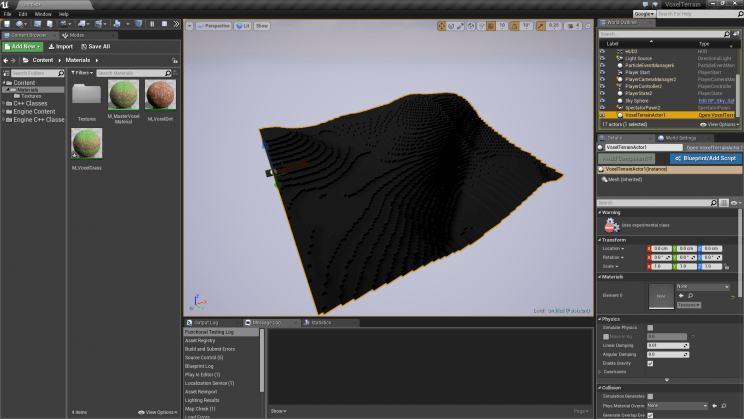
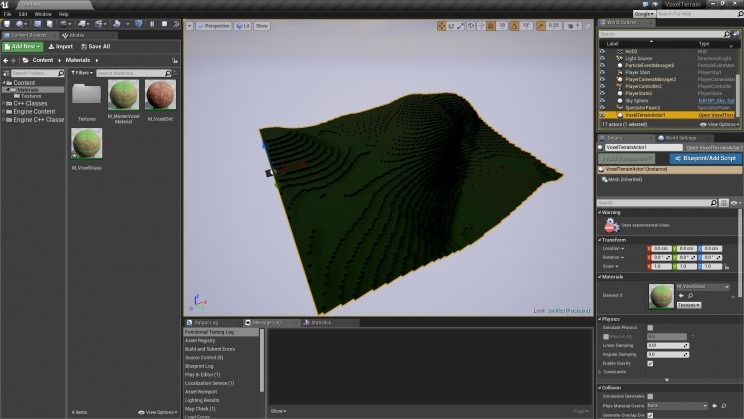
Select the actor and find the Materials category in the details panel. Once you find the correct category, set Element 0 of the Materials array to your material instance. You should immediately see the terrain change to apply your material like so:
Applying The Material Automatically
Now that we’ve tested our material, let’s make it so we can apply it automatically from the editor. This requires a few small code changes to pull off. Open the project files in your IDE if you haven’t already and open the header and implementation files for your voxel terrain actor. Starting off with the header file, find the variables you declared for the voxel terrain actor class in previous parts of the tutorial series. You only need to add one new variable to this area, specifically this one:
// The material to apply to our voxel terrain
UPROPERTY(Category = "Voxel Terrain", BlueprintReadWrite, EditAnywhere) UMaterialInterface* TerrainMaterial;
Now that you’ve declared that variable, you need to tell the mesh to make use of it. To do that open the implementation file and make your way down to the BeginPlay function. Add the following line after the call to CreateMeshSection:
Mesh->SetMaterial(0, TerrainMaterial);
It should end up looking like this:
// Finally create the mesh
Mesh->CreateMeshSection(0, Vertices, Indices, Normals, UV0, Colors, Tangents, true);
Mesh->SetMaterial(0, TerrainMaterial);
Once you have that done go ahead and compile the project and reopen your editor if you closed it. You should see a new variable on the voxel terrain actor called Terrain Material. If you set this to your grass material and hit play you should end up with the material being automatically applied to the terrain.
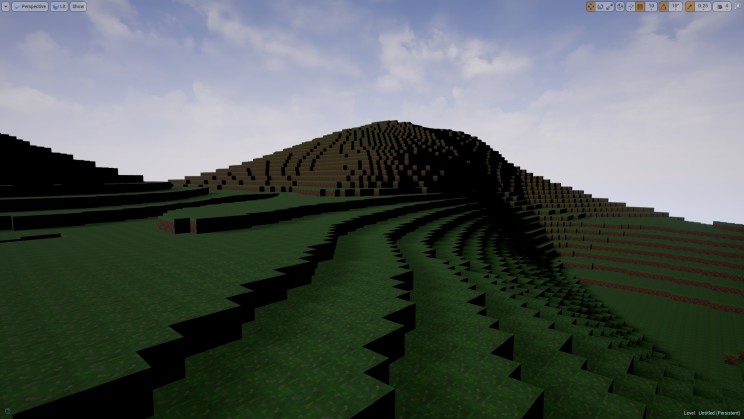
If that worked then you’re now done with this section of the tutorial, hooray. If it didn’t work, or you think I missed something, then let me know in the comments, and I’ll do my best to fix the issue. That concludes the basics of creating voxel terrain in Unreal Engine 4, however, that does not meant this is the end of this tutorial series. There is still a lot left to cover, for example I’m sure you’d like to be able to use multiple materials on your terrain, right? I’ll be covering how to do just that in the next part of this series, so stay tuned.
Great tutorials series, nice accessibility and really usefull !
I can’t wait for the next part !!!!
Thank you so much dude
That’s strange, if i change the noise offset, i get a fatal error… I don’t know why
That’s very strange! I’m not experiencing that issue locally, could you provide more details?
Specifically I’d like to know what kind of fatal error it’s giving you, what you’re setting the noise offset to, and if possible, a stack trace to help you find out where it crashes.
That’s fixed, but i don’t know how :p
I trying to make a save system for thoses voxels and that’s a bit hard
I’m able to save, but not to load and restore (I’m using the binary save system)
My save system is now working =)
But i don’t save the tangents, and i don’t see any changes… Same if i change the seed…
22 Seconds to generate a 250*250*63 Voxels Chunk, and 3 to load it =)
Good to hear you got that working! If you don’t save the tangents then the engine will attempt to calculate them for you, which can sometimes have undesirable effects, however, it should be fine in most cases.
As for the seed not changing the terrain; there are a few things I can see causing that. Can you make sure that you have the
virtual void PostInitializeComponents() override;function override in your class definition, and defined in your implementation file? If it’s missing then that would explain why the seed isn’t working. You can find the implementation for that function in Part 2 of the tutorial series if you’re missing it, it’s under the The PostInitializeComponents Function section. If that isn’t the cause of the issue then let me know and I’ll walk you through some other possible causes.For the seed problem, that not in fact a problem, i just said I save the terrain informations [like octaves, vertices, …] but i don’t save the tangents [i going to save it right now] but if i change the seed without the tangents save, that’s don’t change anything on a loaded terrain. And cause of that i tought tangents are useless. But i’m back from my week now, i can work on it.
Do you have a track for me to have a system to edit in realtime my terrain and/or to have more than 1 block ?
Thank you in past and advance for your help =)
[And sorry for my bad english, i’m belgian =D]
InsideBSI
Okay I think I understood !
In one line, tangents is usefull for smooth terrains ?
In short: yes tangents are a very useful thing to have on any mesh. They are what tells the engine what direction your vertices are facing, which is required for correct lighting.
To answer your previous question about editing the terrain and having multiple voxel types: I’ll be getting back to work on this tutorial series soon! The next part will show you how to use multiple voxel types(and therefore multiple materials like grass, stone, and dirt).
Hi, great tutorials! When will be released the next part?
Any ETA on part 5? Great job!
Hello, how i can use it in my editor? I placed VoxelTerrainActor in the scene and press play and notihng happens, please help me