In the intermission between parts two and three, I figured giving you guys a way to test the code we wrote in part two would be a good idea. We’ll be covering two things in this part of the tutorial: compiling the PolyVox examples, and modifying the Paging example to test our noise generation. For this part of the series we’re going to need to install CMake and Qt5, but otherwise it will mostly be copy pasting code.
Compiling The PolyVox Examples
First thing’s first, we need to get setup to compile the PolyVox examples. To do that we need to install CMake and Qt5 like I mentioned before, so go ahead and grab the latest versions of both for your OS. If you’re reading this far in the future and the latest versions aren’t compatible anymore, I’m using Qt 5.6 and CMake 3.3.1 specifically. Once you have those installed, go ahead and open up CMake’s GUI tool.
If your OS doesn’t support the CMake GUI, you can find information about building PolyVox here, however, it should be noted that at the time of this tutorial the PolyVox documentation is highly outdated. You can also find the CMake documentation here. If you have issues getting this to work, let me know in the comments and I’ll do my best to help.
Configuring The Project With CMake
Once you have the CMake GUI open go ahead and point the two directory boxes at the top to the location of your PolyVox folder like I’ve done below.
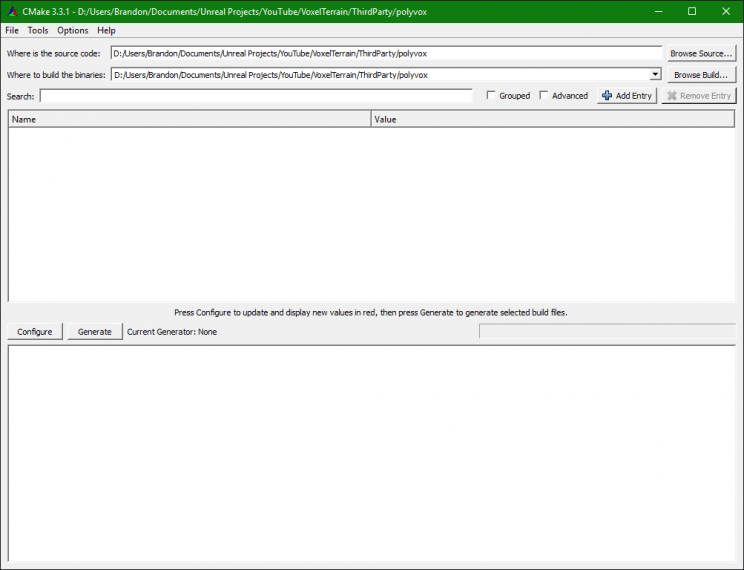
Once you have the directories set, press the configure button. Another window will pop up and ask what generator you want to use, I’ve gone ahead and selected Visual Studio 2015, because that’s what I’m using.
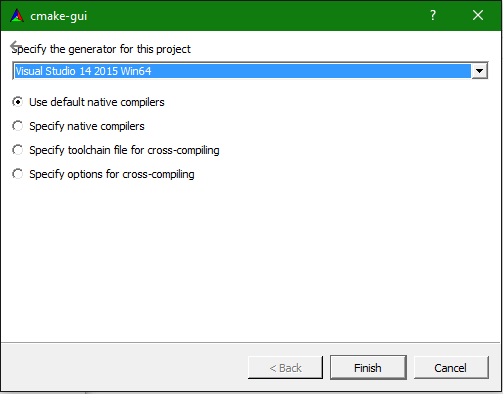
After you select your generator all you need to do is press finish and wait for it to finish configuring itself. Once it’s done you’re going to have a bunch of stuff pop up in red like so:
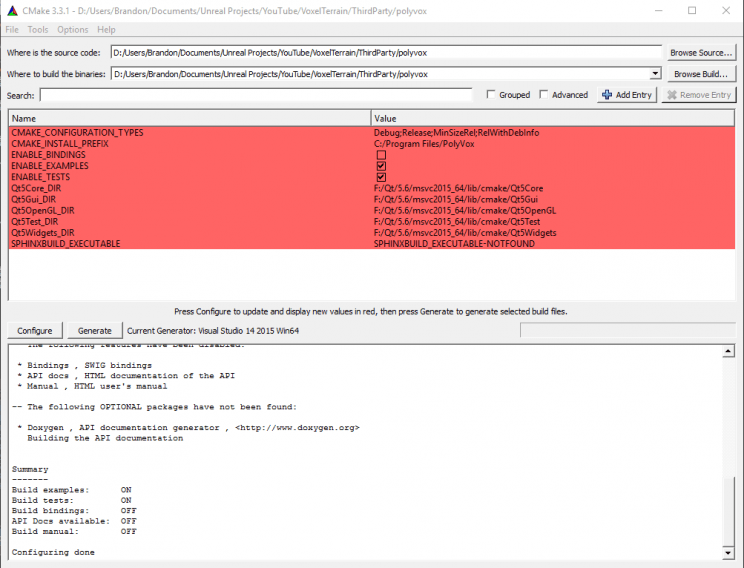
If you haven’t used CMake with Qt before it might not detect Qt like it did for me. In that case go ahead and tell it where Qt is installed at. You can see where mine is located in the above image. If it did detect Qt, then make sure you have examples and tests enabled, and press the generate button. That should finish up pretty much right away (there might be a few warnings), and you should now have your project files.
Modifying The Example Code
Now that we have our project files we need to modify the example we’ll be using to test our code. The file we need to edit is the main.cpp file of the PagingExample example. We’ll be changing three sections in this file: the includes, the pageIn function, and the initializeExample function.
We’ll start with the includes, go ahead and add these two lines to the include block near the top of the file:
#include "VM/kernel.h"
using namespace anl;
Next go down to the pageIn function, we’re going to replace it with the code we wrote in the previous example.
virtual void pageIn(const PolyVox::Region& region, PagedVolume<MaterialDensityPair44>::Chunk* Chunk)
	{
		// Some variables to control our terrain generator
		// The seed of our fractal
		uint32_t Seed = 123;

		// The number of octaves that the noise generator will use
		uint32_t NoiseOctaves = 3;

		// The frequency of the noise
		float NoiseFrequency = 0.01;

		// The scale of the noise. The output of the TerrainFractal is multiplied by this.
		float NoiseScale = 32;

		// The offset of the noise. This value is added to the output of the TerrainFractal.
		float NoiseOffset = 0;

		// The maximum height of the generated terrain in voxels. NOTE: Changing this will affect where the ground begins!
		float TerrainHeight = 64;

		// This is our kernel. It is responsible for generating our noise.
		CKernel NoiseKernel;

		// Commonly used constants
		auto Zero = NoiseKernel.constant(0);
		auto One = NoiseKernel.constant(1);
		auto VerticalHeight = NoiseKernel.constant(TerrainHeight);

		// Create a gradient on the vertical axis to form our ground plane.
		auto VerticalGradient = NoiseKernel.divide(NoiseKernel.clamp(NoiseKernel.subtract(VerticalHeight, NoiseKernel.z()), Zero, VerticalHeight), VerticalHeight);

		// Turn our gradient into two solids that represent the ground and air. This prevents floating terrain from forming later.
		auto VerticalSelect = NoiseKernel.select(Zero, One, VerticalGradient, NoiseKernel.constant(0.5), Zero);

		// This is the actual noise generator we'll be using.
		// In this case I've gone with a simple fBm generator, which will create terrain that looks like smooth, rolling hills.
		auto TerrainFractal = NoiseKernel.simplefBm(BasisTypes::BASIS_SIMPLEX, InterpolationTypes::INTERP_LINEAR, NoiseOctaves, NoiseFrequency, Seed);

		// Scale and offset the generated noise value.
		// Scaling the noise makes the features bigger or smaller, and offsetting it will move the terrain up and down.
		auto TerrainScale = NoiseKernel.scaleOffset(TerrainFractal, NoiseScale, NoiseOffset);

		// Setting the Z scale of the fractal to 0 will effectively turn the fractal into a heightmap.
		auto TerrainZScale = NoiseKernel.scaleZ(TerrainScale, Zero);

		// Finally, apply the Z offset we just calculated from the fractal to our ground plane.
		auto PerturbGradient = NoiseKernel.translateZ(VerticalSelect, TerrainZScale);

		CNoiseExecutor TerrainExecutor(NoiseKernel);

		// Now that we have our noise setup, let's loop over our chunk and apply it.
		for (int x = region.getLowerX(); x <= region.getUpperX(); x++)
		{
			for (int y = region.getLowerY(); y <= region.getUpperY(); y++)
			{
				for (int z = region.getLowerZ(); z <= region.getUpperZ(); z++)
				{
					// Evaluate the noise
					auto EvaluatedNoise = TerrainExecutor.evaluateScalar(x, y, z, PerturbGradient);
					MaterialDensityPair44 Voxel;

					bool bSolid = EvaluatedNoise > 0.5;
					Voxel.setDensity(bSolid ? 255 : 0);
					Voxel.setMaterial(bSolid ? 1 : 0);

					// Voxel position within a chunk always start from zero. So if a chunk represents region (4, 8, 12) to (11, 19, 15)
					// then the valid chunk voxels are from (0, 0, 0) to (7, 11, 3). Hence we subtract the lower corner position of the
					// region from the volume space position in order to get the chunk space position.
					Chunk->setVoxel(x - region.getLowerX(), y - region.getLowerY(), z - region.getLowerZ(), Voxel);
				}
			}
		}
	}
You probably noticed I made a couple of small changes to the function. The two changes I made were adding the variable definitions we previously had on our pager to the function, and changing any of the Unreal Engine 4 integer types over to the ones PolyVox uses. Specifically, I changed all references to uint32 to uint32_t. There is one last section to change in the file, which is an optional change, however, it will greatly improve the run-time of the program. Scroll down to the initializeExample function in the PagingExample class and replace it with this:
void initializeExample() override
{
	PerlinNoisePager* pager = new PerlinNoisePager();
	PagedVolume<MaterialDensityPair44> volData(pager, 8 * 1024 * 1024, 64);

	// Extract the surface
	PolyVox::Region reg2(Vector3DInt32(0, 0, 0), Vector3DInt32(127, 127, 63));
	auto mesh = extractCubicMesh(&volData, reg2);
	std::cout << "#vertices: " << mesh.getNoOfVertices() << std::endl;

	auto decodedMesh = decodeMesh(mesh);

	// Pass the surface to the OpenGL window
	addMesh(decodedMesh);

	setCameraTransform(QVector3D(60, 60, 60), -(PI / 4.0f), PI + (PI / 4.0f));
}
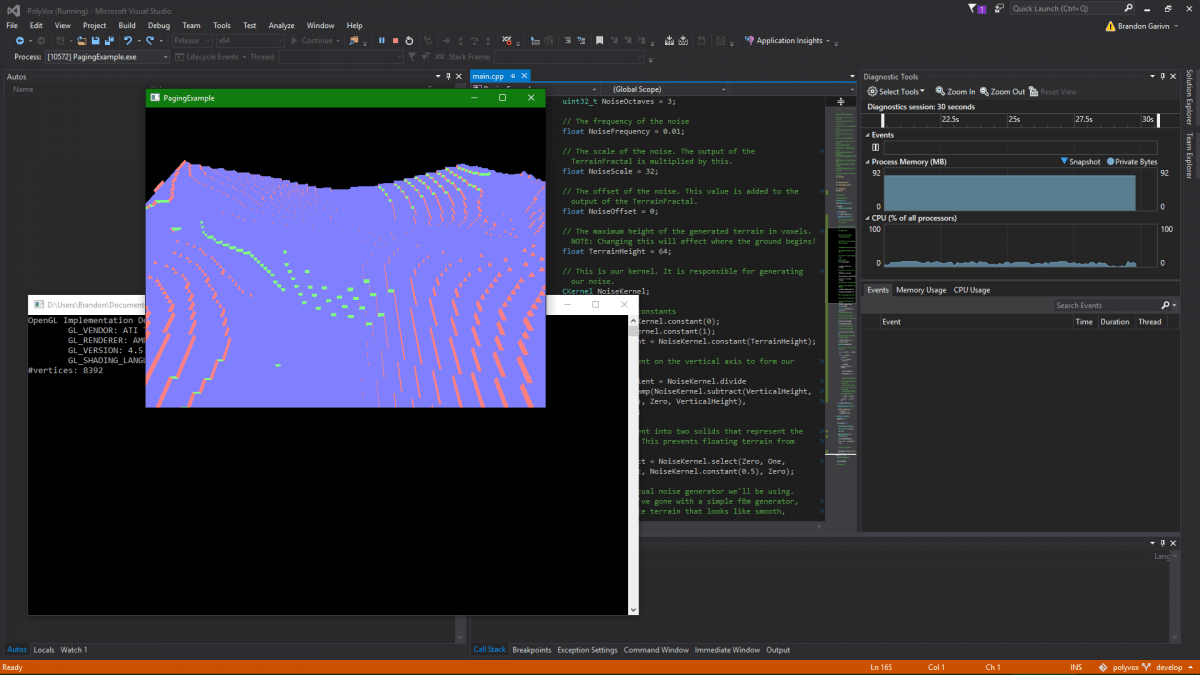
You will likely notice that this function is quite different from the original function. I removed all of the tests that this function usually performs, and made the region that it extracts smaller. I also moved the camera closer to the mesh so you don’t need to fly for a long time to see the results of your changes.
Building The Example With Visual Studio 2015
From here on the instructions change wildly depending on what IDE and compiler you’re using. I’m currently using Windows 10 as my primary OS, so I’ll be covering the rest with Visual Studio 2015. Before we can build the example we need to tell the compiler where the ANL headers and library are located. Right click on the PagingExample project and go to properties. Once you have the properties window open, go to the C/C++ section and open the General section. Select the Additional Include Directories option and click on the drop down arrow that appears on the right to get to the edit option.
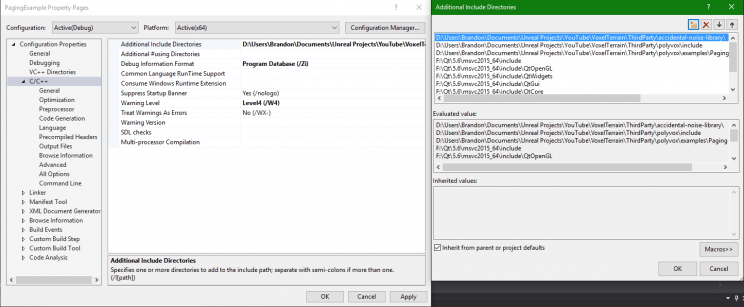
Add a new line and give it the path to the ANL folder, which should be ProjectFolder/ThirdParty/accidental-noise-library. Next go to the Linker section and under Input find the option for Additional Dependencies and open up the edit window again.
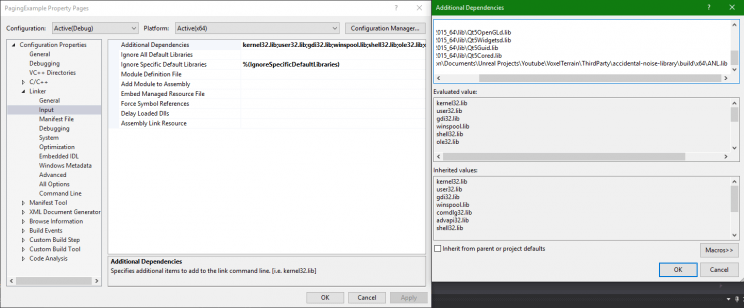
Add a new line with the path to the ANL.lib file, which should look like ProjectFolder/ThirdParty/accidental-noise-library/build/ANL/x64/ANL.lib and you should be ready to compile and run the example. Set the PagingExample project to be the Startup Project and build the project. If it succeeds then go ahead and run it, after a small wait it should pop up and render a chunk of terrain. If it doesn’t, then move on to the next section, which has a bit of troubleshooting information.
Troubleshooting The PagingExample
This section contains a list of reasons why compiling the project might have failed. I’ll keep it updated with any issues people have as they come across them.
The most likely reason that the example failed to compile is a configuration mismatch. Make sure that when you compiled the example you compiled it using the same configuration that you used for ANL. If you have this issue, make sure to apply the changes described in the Building The Example With Visual Studio 2015 section above to the new configuration!
0 comments on “Voxel Terrain In Unreal Engine 4 Part 2.5: Testing Generation Using The PolyVox Examples”Add yours →